Difference between revisions of "Cataloging Features in XnView MP"
From XnView Wiki
m (moved User:M th/cataloging to Cataloging Features in XnView MP) |
|
(No difference)
| |
Revision as of 09:24, 16 April 2014
XnView MP provides a best-in-class cataloging engine providing quality (rating) cataloging, customizable colors assignment, IPTC/XMP entries (for some file formats) as well as categories (keywords) cataloging.
Ratings
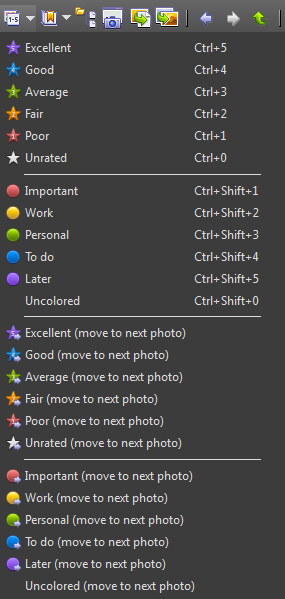
XnView provides a classical 1-5 stars rating engine, however it provides a fully customizable shortcut key assignment for each action (go to Tools | Settings | Interface | Shortcuts to customize) as well as ...(move to next photo) counterparts for each rating action. See the Ratings/Colors menu with the default settings:
Besides the above menu and shortcuts, you have the convenience to assign Ratings (as well as Colors) on each thumbnail by clicking on the corresponding icon in the top-left corner of the thumb.
Colors
The Colors share the same features with the Ratings having in plus the possibility to customize the Labels of the colors, that is you can go to Tools | Settings | Metadata | Labels and change the default labels (Important, Work, Personal, To do, Later) to any other text you like.
IPTC/XMP Window
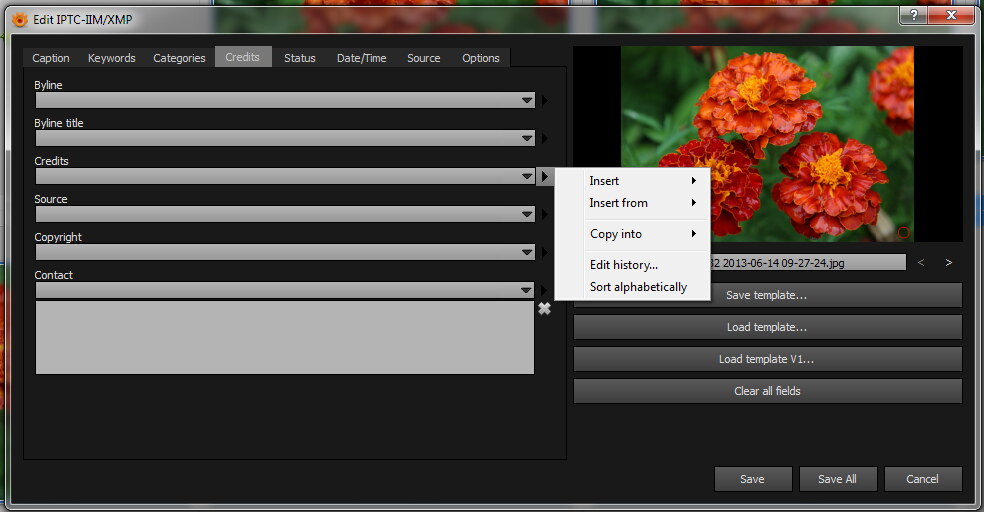
The IPTC information can be edited by selecting the desired files (the IPTC/XMP window supports multi-selection) and (if the file formats supports it) go to Tools | Metadata | Edit IPTC/XMP to show up the window:
The usage is pretty straightforward, the module having support for templates, variables and history lists for the fields. Also you have the possibility to change different settings in the last tab called Options.
If the window is opened with multiple files selected, then a Save All button appears which will save, with a touch of a button, the new metadata values for all the files which were edited/loaded in module.
Categories (Keywords) Cataloging
The Categories Cataloging module provides a state-of-the art high-speed cataloging which is achieved through the means of two panes: Categories and Category Sets. The first pane deals with the low-level management of the categories (keywords) seeing them as separate entities, while the second pane group them in Sets which are ready to use in different situations during cataloging.
It features industry-first features like Regular Expressions in category search, Auto Correct and Layouts for Category Sets
Categories Pane
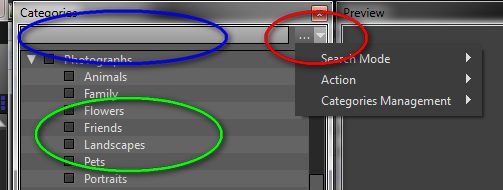
GUI-wise Categories Pane looks somewhat like this:
It presents the categories in a tree-like manner (see the Green Circle) together with the necessary management tooling: Incremental Search edit box (marked with the Blue Circle), Tools menu (marked with the Red Circle) and the Right-Click drop-down Popup Menu (not pictured) which appears when the user right-clicks on a category.
- Incremental search - a standard feature with which you can search for any category you want. In the Tools menu you can choose between the following ways in performing search:
- Partial Match at the Beginning - View matches 'Viewport but NOT XnView MP
- Partial Match Anywhere - View matches 'Viewport AND XnView MP
- Regular Expressions - Uses Regular Expressions to match the sought Category. (See also a Cheat Sheet here).
If in Incremental Search you cannot find the category which you want, pressing the Enter key twice will allow you to create a new category.
Also, in Tools menu you can choose what action to be done when the Category is found: Assign the Category (default action) or just Open Tree. The latter is useful when you'll do mostly category management actions like moving, renaming etc.
Another group of actions to be found in Tools menu is Category Management which allows Import/Export lists of categories in standard Controlled Vocabulary format which is compatible with Lightroom and other photo management programs. Here is also present a menu entry to Auto Correct page which allows entering of synonyms (eg. dad for father) as well as text shortcuts (eg. NY for New York) for different categories. The Auto Correct module is shared for the entire program, working also at creating/renaming files and folders (you need to have the Tools | Settings | General | File Operations | Use dialog to rename file/folder for this to work) as well as in Copy To... and Move To... dialogs.
In Right-Click Popup Menu the options are self-explaining, the ones which need more explanations are Move to... and Merge With.. which both support multiple selected categories:
- Move to... - Will assign a new parent to the selection. Will open a Categories tree (like in Edit... window) to select the new parent.
- Merge with... - All the items from the selection will be transferred to the target and the selection will be deleted. Will open a Categories tree to select the target.
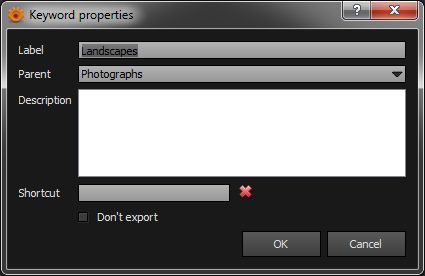
The Category/Keyword Properties Window invoked by Edit... option in Right-Click menu looks like this:
As you can see, you can rename the category from here.
Also, in this dialog you change its parent, providing an alternative (sometimes, safer and easier) way to Move to... option discussed above and to drag & drop.
In Description box you can enter any text you like. The text will be displayed as a hint when you'll hover the mouse over the category in the Category Tree.
Shortcuts
You can also assign a Shortcut to any category. In the Thumbs pane, the program handles first the shortcuts for the categories and after this the program general shortcuts, hence if you'll assign 'Ctrl+P' to "Portraits" and to Print command, the "Portraits", the category will take precedence. Other things to keep in mind:
- You can assign single keystrokes to categories (for example "P" for Portraits)
- If you assign the same shortcut for two or more categories all categories with the same shortcut will be assigned to the selected image(s).
Category Sets Pane
It manages the categories in Sets (Groups) of Categories. These Sets can be system-managed (that is the program creates and maintains them) or user-created (that is you can create and manage them).
The Category Sets are very important because it provides a very quick way to access related categories for a certain cataloging need (folder(s) of photos). Usually, folders have images grouped thematically (landscape, photo journalism, weddings etc.) and having quick sets of 'favorite' categories for each situation is very handy.
Some examples:
- Weddings
- Bride
- Groom
- Candid
- Wedding Party
- Family
- Black & White
- Pre-Ceremony
- Ceremony
- Detail
- Portrait
- Outdoor
- Candid
- Individuals
- Pets
- Fashion
- Headshots
- Kids
- Babies
...
Unlike in other programs (eg. Lightroom) you can have more than one set active and you can have an unlimited number of categories in a set.
For example, for a folder containing photos from a Wedding, both the above sets will be nice to have opened. On the other hand, for a folder containing a photo report from a sports event, it is better to have quick access to Sports, Action and Portrait sets. Managing these different situation is done via Layout management (see bellow).
For the beginning let's look at the GUI:
As you see, by default, the pane has only the system-managed sets:
- History - which shows the list of the assigned categories in descending chronological order
- Suggested - the program will suggest the most probable categories for the current selection based on already assigned categories
- Assigned - the assigned categories for the current selection
The categories in bold are assigned for all the photos from the selection.
The categories rendered in italics are assigned just for some photos from the selection.
By pressing the Manager... button in the top-left corner, you can create more custom category sets which will be shown by default under the system-managed sets. The Category Sets manager has all the necessary tooling to manage your sets.
Another way to create a set is to go in the pane to Assigned system set, right click on a category and choose from the popup menu Create set from selection...
The categories in Category Sets pane have a different right-click popup menu, according with the set in which they appear.
Changing Layout of Sets
Changing the layout of sets is important because according with the situation, the user needs different sets to be readily available. Repeating the above examples, we need for a Wedding the 'Wedding' and 'Portraits' sets to be opened and on screen while for a Sports event we need 'Sports', 'Action' and 'Portraits' sets to be readily available (opened and on screen). Of course, your organization of sets might differ.
We have two ways to change the layout of sets:
- The sets can be dragged and dropped in order to change their vertical order.
- We can expand/collapse them by clicking on the small arrow (chevron) on the left of the set name
After we set up our layout, we can save it by clicking on the "+" button in the top-right corner to add a new Set Layout. The newly saved Set Layout will be available in the drop-down list located in the middle of the top toolbar (see the screenshot above).


